Just a reminder of our photography group tonight at 7 pm at the Cedar Hills Park - you can see more information by scrolling down below the "Composition" post. Hope to see you all there! It should be fun (any excuse to get together, right?) ;)
Bring your cameras and if you want, your families!
Wednesday, August 5, 2009
Thursday, July 2, 2009
Composition
Last night's class for a lot of fun - it's so great having you all at my house laughing and having a good time! Thanks for coming. Here's the presentation. I'll add some more pictures later (no time this morning). If you have any questions, let me know. Thanks!
Good news! This month’s lesson is for ANYONE – regardless of the type of camera. These are all ideas you can use even if you want to shoot in Auto mode (but I hope you don’t).


Tips for Shooting Fireworks:Bring a tripod and flashlight to the fireworks display. It's dark and you'll need longer exposures, so use the tripod to avoid blurry pictures. The flashlight will help you adjust your camera settings in the dark. Taken from: Cory Adams Photography
Now, on to the show…Don’t worry if these look familiar, we are going to review the“10 Ways to Improve Your Pictures” first, and then we’ll add some more at the end.
4. Get down on their level.
5. Know your flash
•Avoid red eye by producing more light (shoot outdoors, open window coverings, move your flash off of your camera).
•If your flash only works up to 10’, don’t try to shoot something further away when you have low light.
•Try using your flash outdoors (fill flash). This works well on really sunny or cloudy days. This helps lighten up their eyes and any other shadows caused by the sun.
•Try turning your flash off indoors.
6. Frame Your Subject
•Use trees or a building to help frame out your subject.
•Don’t be passive. Help people look their best.
•Move people around, add props or try different viewpoints (360).
•Bring people’s faces together.
•Take LOTS and LOTS of pictures. The more pictures you take, the better chance you have of getting the “perfect” picture.
•When taking pictures of people, posed pictures aren’t always best. Try to take pictures of people without them knowing or while they’re busy doing something else.
•“Grandma Pictures” – your subject doesn’t always have to be looking at the camera smiling.
•If you can avoid it, don’t tell kids to say “cheese” or “smile”. Tell them a joke. Bark like a dog. Laugh really loud. Get them to smile naturally and you’ll get a much better picture than a forced smile.
I could go on and on forever!! Just by googling photography & composition, I found ENDLESS ideas. Hopefully this will just give you something to think about as you are taking your pictures.
COMPOSITION -
“The artistic arrangement of the parts of a picture.”
Oxford American Dictionary
“The artistic arrangement of the parts of a picture.”
Oxford American Dictionary
•Remember, these are just “guidelines” not hard-core “rules.”
•Photography is an art – and the beauty is in the eyes of the beholder.
•You might like a certain picture style and not others. That’s okay.
•You can decide what you like best.
•Photography is an art – and the beauty is in the eyes of the beholder.
•You might like a certain picture style and not others. That’s okay.
•You can decide what you like best.
Good news! This month’s lesson is for ANYONE – regardless of the type of camera. These are all ideas you can use even if you want to shoot in Auto mode (but I hope you don’t).
One of the best ways, in my opinion, of learning about composition is to find a picture you like. Study the picture and try to figure out why you like it.
Photo courtesy of Christie
Does it have good lighting? Does it have an unusual angle or lines? Are the color unique or different?What do your eyes do when you look at the picture?Now, try to copy that picture. See if you can replicate it.
Photo courtesy of Stephanie
BUT FIRST>>> Just in time for the 4th of July......
Tips for Shooting Fireworks:Bring a tripod and flashlight to the fireworks display. It's dark and you'll need longer exposures, so use the tripod to avoid blurry pictures. The flashlight will help you adjust your camera settings in the dark. Taken from: Cory Adams Photography
Set your camera to Fireworks mode (if you have that feature), which will automatically take care of the settings. If you don't have Fireworks mode, set your camera to
Manual mode:
ISO 200,
aperture f/8, and
shutter speed between 5 and 15 seconds.
After you take a few pictures, take a look at how they are turning out, and adjust the shutter speed accordingly (leave the ISO and f-stop alone).
Include a landmark in the photo, such as a statue, stadium, park, lake, or whatever the surrounding area includes. As the fireworks explode, they will light up the landmark beautifully.Take a lot of pictures! You can take over 100 pictures and only keep 2 great ones. The more pictures you take, the greater chance you have of capturing the perfect shot. Be a ruthless editor; you only need one or a few photos to frame and share!
Remember that fireworks come fast and furious during the finale of the show. Therefore, you may need to decrease your shutter speed. 15 seconds will likely be overexposed during the finale. Try 5 seconds instead.
Now, on to the show…Don’t worry if these look familiar, we are going to review the“10 Ways to Improve Your Pictures” first, and then we’ll add some more at the end.
1. Get CLOSER. In my opinion, the number one thing you can do to improve your pictures is to move in closer.
Use your zoom.
Step in closer.
Don’t be afraid to cut off heads.
Fill the view finder with the subject.
Keep your arms close to your body and take a deep breath, hold it, and then take the picture. This will help prevent blurry pictures.
Use your zoom.
Step in closer.
Don’t be afraid to cut off heads.
Fill the view finder with the subject.
Keep your arms close to your body and take a deep breath, hold it, and then take the picture. This will help prevent blurry pictures.
2. Avoid Cluttered Backgrounds
•Look behind your subject to make sure he doesn’t have a tree or pole growing out of his head.
•The more simple the background, the better. A cluttered background will be distracting while a simple/plain background will emphasize your subject.
•Look behind your subject to make sure he doesn’t have a tree or pole growing out of his head.
•The more simple the background, the better. A cluttered background will be distracting while a simple/plain background will emphasize your subject.
3. Rule of Thirds
•Keep the main point of interest away from the middle.
•Pretend there is a tic tac toe board in your viewfinder. Put the main interest at one of the intersections of those lines.
•You will have to lock your focus and then move your subject off center. This is done by pushing the button half way.
•Don’t put your subject dead center in the picture. Lock your focus by pushing the button down half way and then recompose the picture.
•THE EXCEPTION, in my opinion, is with group pictures. If you are shooting more than 2 people, I think it should be centered. You can still lock the focus on their eyes and recompose so there’s not so much head room, but don’t move them off centered.
4. Get down on their level.
•Don’t shoot everything from a standing position.
•If you are shooting kids or animals, get down on their level by getting on your knees or tummy.
•Shoot at eye level.
•If you are shooting kids or animals, get down on their level by getting on your knees or tummy.
•Shoot at eye level.
5. Know your flash
•Avoid red eye by producing more light (shoot outdoors, open window coverings, move your flash off of your camera).
•If your flash only works up to 10’, don’t try to shoot something further away when you have low light.
•Try using your flash outdoors (fill flash). This works well on really sunny or cloudy days. This helps lighten up their eyes and any other shadows caused by the sun.
•Try turning your flash off indoors.
6. Frame Your Subject
•Use trees or a building to help frame out your subject.
7. Try Unusual Angles
•Look for unusual angles by adjusting your camera. Don’t be afraid to be creative.
•If you have a horizon, try to keep it level or your picture will look crooked (like a picture of the temple, ocean, sunset, etc.)
•Also, be sure to keep your horizon true to the rule of thirds. Place it along one of the lines.
•Don’t always shoot horizontal. Turn your camera vertical as well.
8. Watch the Light
•If you are shooting outside, avoid the middle of the day. The best light is sunrise and sunset.
•Cloudy days are good as the light is being filtered through the clouds.
•Try using natural light indoors by placing your subject next to the window. You can use a white cardboard to reflect light on the other side.
9. Look for Interesting Lines
•Cloudy days are good as the light is being filtered through the clouds.
•Try using natural light indoors by placing your subject next to the window. You can use a white cardboard to reflect light on the other side.
9. Look for Interesting Lines
•Fences, roads, railroads, etc. all make good pictures. They help your eyes move to the main subject.
•Look for patterns.
10. Be a Picture Director
•Look for patterns.
10. Be a Picture Director
•Don’t be passive. Help people look their best.
•Move people around, add props or try different viewpoints (360).
•Bring people’s faces together.
•Take LOTS and LOTS of pictures. The more pictures you take, the better chance you have of getting the “perfect” picture.
•When taking pictures of people, posed pictures aren’t always best. Try to take pictures of people without them knowing or while they’re busy doing something else.
•“Grandma Pictures” – your subject doesn’t always have to be looking at the camera smiling.
•If you can avoid it, don’t tell kids to say “cheese” or “smile”. Tell them a joke. Bark like a dog. Laugh really loud. Get them to smile naturally and you’ll get a much better picture than a forced smile.
Digital Photography School - 5 Elements of Composition:
Patterns, Symmetry, Texture, Depth of Field, Lines
I could go on and on forever!! Just by googling photography & composition, I found ENDLESS ideas. Hopefully this will just give you something to think about as you are taking your pictures.
One Last Thing...
•Rules were meant to be broken (except the commandments)
•Don’t be afraid to try new things – even if it breaks the photography rules.
•Also, don’t forget to read your camera manual. So simple, yet so important.
•Rules were meant to be broken (except the commandments)
•Don’t be afraid to try new things – even if it breaks the photography rules.
•Also, don’t forget to read your camera manual. So simple, yet so important.
HOMEWORK
•If you want it, here it is…
•Check the blog for an extensive list of what has been talked about tonight.
•Try to implement a few (if not all) of these composition guidelines.
•Post them on the blog.
•Questions?
•If you want it, here it is…
•Check the blog for an extensive list of what has been talked about tonight.
•Try to implement a few (if not all) of these composition guidelines.
•Post them on the blog.
•Questions?
Wednesday, July 1, 2009
Next Meeting
We have persuaded Julie to take us on
another fun photo walk!
Our next meeting will be held on
Wednesday, August 5th,
at 7:00pm
at Heritage Park in Cedar Hills
(4450 W. Cedar Hills Drive)
There are two easy ways to get there:
- Take State Street to 100 East in PG and turn north (at Purple Turtle). Drive north 4.1 miles. Turn left onto Cedar Hills Drive. Park is on the left at the bottom of the hill just before the elementary school.
-You can also take State Street to 2000 W, PG/ 1100 East, AF. Turn north and drive past AF Hospital and Mt. Timpanogos Temple. At the intersection just south of Lone Peak High School, turn right onto Cedar Hills Drive and follow the road through the roundabout. Park is on the right just after the elementary school.
We will meet together first for Julie to present our lesson outdoors, and then we can explore this beautiful park and practice our new skills! Feel free to bring your family and/ or invite your friends. Everyone is invited to bring a potluck dessert to share. (But still come of you don’t have something- I will be bringing yummy carrots and apples to share,
cause I KNOW that’s what you all had in mind when you thought of desserts!)
Hope to see you all there!
(PS- if anyone notices that I am missing any information, will you please add it?)
Tuesday, June 23, 2009
UPDATE....next meeting.....
For personal reasons, I've decided to postpone our monthly meeting/class until next week.
I'm REALLY excited for this next meeting. If you've never been to one of our meetings or if you know someone who has never come, this is the meeting you don't want to miss!!!
We will be talking about composition. Basically, this is how to compose your pictures to be more pleasing to the eye. This is the lesson I've been waiting to teach since I started this class!! So, even if you're not interested in aperture, shutter speed, ISO, etc......, and you're just wanting to improve your pictures, you'll want to make sure and come!
If you have any questions/concerns, please e-mail me at: taggartphotography@gmail.com
Hope to see you there!
Wednesday, July 1st, 8:30 pm
Same Place
I'm REALLY excited for this next meeting. If you've never been to one of our meetings or if you know someone who has never come, this is the meeting you don't want to miss!!!
We will be talking about composition. Basically, this is how to compose your pictures to be more pleasing to the eye. This is the lesson I've been waiting to teach since I started this class!! So, even if you're not interested in aperture, shutter speed, ISO, etc......, and you're just wanting to improve your pictures, you'll want to make sure and come!
If you have any questions/concerns, please e-mail me at: taggartphotography@gmail.com
Hope to see you there!
Tuesday, June 16, 2009
Thanksgiving Point Pics... finally!
OK- so I'm a slacker... but I'm still fun!
Here are some of my favorite pics from our photo walk.
Here are some of my favorite pics from our photo walk.
Thanks for taking us Julie- it was a lot of fun!


Thursday, June 11, 2009
I promise....
Life has been a bit hectic and I'm sorry I haven't posted notes from our last meeting. I promise it will be coming soon.
In the meantime, you can work on your homework! :)
Go out on a sunny day and take a picture with your flash and then without your flash.
Side note: I just found out that there might be a conflict with our next meeting. PLEASE check back here soon and I'll post dates as soon as I get more information.
Oh yea, and this next meeting is not one you'll want to miss! This is the one I've been looking forward to since we started our photography group!!!! Woo hoo! It's all about composition (i.e. how to take good pictures). So, if you know of someone who would like to come - even if they don't want to learn all the technical stuff - bring them! For this class it doesn't matter what kind of camera you have. This is just some general rules/ideas of how to take better pictures. Remember our first meeting and I gave you the 10 ways to improve your pictures? This is it - except in more detail! This is the stuff you can sink your teeth into. The meat. The fun stuff. Okay, you get the idea. Start spreading the word and I'll look more into the dates.
Also, does anyone want to volunteer for the treats?
Julie
Sunday, May 24, 2009
Okay, I'm not joking when I say I have "Mommy Brain"
Okay, really, I can't remember.... do we meet on the last WEDNESDAY or THURSDAY of each month? I can't remember................
Friday, May 22, 2009
Photography Challenges
I just joined a photography group online. They have weekly challenges and then you post your pictures on facebook for all to see. This last week's challenge was:
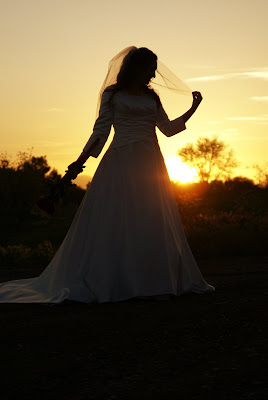
"Statues, Sculptures and Silhouettes, Oh My!"
I decided to post these two pictures from a bridal shoot this last week. They're not my absolute favorite pics from the shoot, but they went along with the theme. 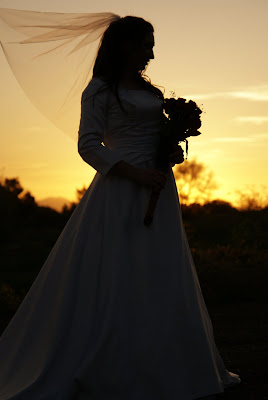
This week's theme is: "We Are Family"
If anyone would like to join, please let me know. We can post our pictures here and/or on facebook. You can interpret the theme any way you want.
Julie
Tuesday, May 19, 2009
Our Next Meeting
Just a little reminder - our next photography group meeting will be on:
WEDNESDAY, May 27th at 8:30 pm.
Same place. If you'd like to bring a friend/family member with you, please do. I think we're officially over all the super "technical" stuff. We'll be working on some general picture rules and/or composition that anyone can use - no matter the camera. The more the merrier. Does anyone remember who's supposed to bring treats? I can never remember (mommy brain)!
We will be talking about our flashes at this next meeting. Also, bring any ideas with you of places we can go on our next photowalk - it was a lot of fun and I look forward to our next one.
A little challenge before our next meeting: Get out and take some pictures! Lots and lots of them. The more you practice, the better you'll get. Also, try shooting in manual mode. Just for fun. If they don't work out, you can delete them. One more thing - don't be afraid to post some of your pictures here - I really really want to see your works of art!
I look forward to seeing you a week from WEDNESDAY.
Getting Closer -- I mean REALLY close
Lisa, I hope you don't mind. I like this picture for a lot of reasons - and I'm glad you were practicing the "GET CLOSER" technique. First, she's a super cutie - I love that she's eating a colorful donut. So, I thought I'd crop it EVEN closer and see how it looked. I then did a little photoshopping to see what I could come up with. What do you think?

Friday, May 15, 2009
Thanksgiving Point Photowalk
We had such a fun night at Thanksgiving Point last night. Our family LOVES that place! We go about once a week if we can!
Here are some pics: BTW, I post all of my pictures straight out of the camera. I never photoshop any of my pictures for the photography group/class. BUT... just so you know, I almost always photoshop any other pictures. Is anyone interested in having a photoshop class???
I was playing with aperture with these two.
f2.8, 1/1250s, ISO 100 f14, 1/80s, ISO 200

Trying different angles.
We were having so much fun playing with shutter speed. It was a lot more fun than shooting my garden hose in the front yard! Stephanie and Christie shot some amazing pics! Since I didn't bring my tripod, I didn't dare go for the really long shutter speeds.
1/30s, f22, ISO 100
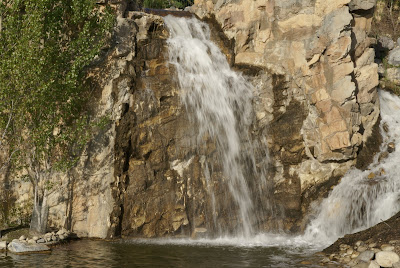
1/2500s, f2.8 ISO 100
 What we were really doing..... trying to keep our kids from falling in the water. :)


Here are some pics: BTW, I post all of my pictures straight out of the camera. I never photoshop any of my pictures for the photography group/class. BUT... just so you know, I almost always photoshop any other pictures. Is anyone interested in having a photoshop class???
I was playing with aperture with these two.
f2.8, 1/1250s, ISO 100
f14, 1/80s, ISO 200Trying different angles.

We were having so much fun playing with shutter speed. It was a lot more fun than shooting my garden hose in the front yard! Stephanie and Christie shot some amazing pics! Since I didn't bring my tripod, I didn't dare go for the really long shutter speeds.
1/30s, f22, ISO 100

1/2500s, f2.8 ISO 100
 What we were really doing..... trying to keep our kids from falling in the water. :)
I love pictures that tell a story. My girls love to make handprints with the water. So cute. Someday those handprints will just keep getting bigger until they lose interest in making them anymore. :(
Stephanie and her hubby taking pictures. You can see her pictures below. Way to go! She's owned her camera for about 2 weeks and has learned what has taken me years to learn!

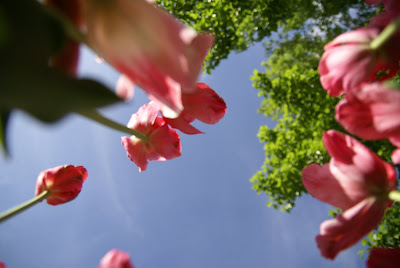
 I was trying to see how many different ways I could shoot the same flower. Here are two of the pictures.

 Christie sitting in the Secret Garden.

 I was so worried that pigeon was going to drop a bomb on me!

 I was trying to see how many different ways I could shoot the same flower. Here are two of the pictures.
 Christie sitting in the Secret Garden.
 I was so worried that pigeon was going to drop a bomb on me!
A really close-up picture.
 What our little boy was LOVING!!!
 I look forward to our next photowalk!!
 What our little boy was LOVING!!!
 I look forward to our next photowalk!!
 Thursday, May 14, 2009


Monday, May 4, 2009
Thanksgiving Point Update
Okay, since the only ones that have been in contact with me about Thursday are the ones that aren't able to make it, I'm going to go out on a limb and make a decision.
Hopefully this works for more people....
We will be going on THURSDAY, MAY 14TH at 6 pm.
Please let me know if this will or will not work for you.
Thanks!!!!
Julie
Hopefully this works for more people....
We will be going on THURSDAY, MAY 14TH at 6 pm.
Please let me know if this will or will not work for you.
Thanks!!!!
Julie
Saturday, May 2, 2009
Thanksgiving Point
You are invited to come with our photography group to THANKSGIVING POINT GARDENS on Thursday, May 7th at 6 pm. We will be practicing some of our mad skills in the beautiful setting. Please e-mail me (Julie) at: taggartphotography@gmail.com to let me know if you can make it. The price is $10/adults and $6/kids, but because we have a membership, you will only have to pay half price. Bring your cameras and enjoy a night out! Please check back here for more information as the day gets closer (in case of crazy, stormy weather or for a second date if too many of you from the group can't make it that night). Bring your significant other - it's a great place to have a date!
Here are some pics we took last week at the gardens just for fun. 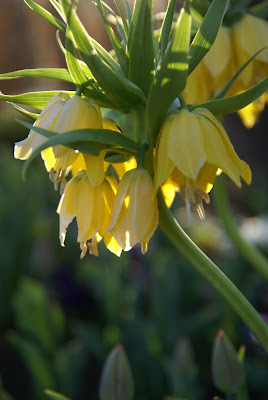


Shooting in Manual and White Balance
We had another great photography night the other day. It's so much fun having you all come over and have fun together! I sure hope I don't overload you and scare you off! We missed a few of you and hope that you're feeling better. We are pretty much done with all of the "technical" stuff. Next month we'll be learning about our flash and then the next month will be about composition (the fun stuff).
Here's a review of "Lesson 3: Putting it All Together: ISO, Shutter Speed and Aperture. White Balance."
Please remember -- We are following the lesson schedule from "Two Peas in a Bucket." Usually I just take the main idea, but for this month, I took most of it word for word for "White Balance" . You can see the actual lesson by clicking on "Two Peas" on the right hand side of the blog. Also, I took the "teeter totter" pictures from this site: http://www.pbase.com/wlhuber/the_basics Because it's all available at this site, I won't be posting the pictures from the lesson.
Okay, here we go...
HOW TO SHOOT IN MANUAL
First, why do you want to shoot in manual mode, you ask? Well, thank you for asking. :) You shoot in manual mode because it allows you to take control of the picture. You get to make the decisions of how you want your picture to look. It also allows you to be more creative in your pictures.
Remember, for this class you don't always have to shoot in manual, but I am encouraging you to stay away from "Auto" mode. Take control of SOMETHING in your pictures - at least put your camera into "Semi-Auto" by using the "A" Aperture Priority Mode and/or "S" Shutter Speed Priority Mode. You can even put your camera into one of those fancy settings like running man or mountain mode. You'll get better pictures just by getting out of "Auto" mode somewhat. As we learn more and get more practice, you'll want to shoot in manual mode - I promise. :)
Exposure - is the image created by the light entering the camera and being recorded onto the film or digital sensor. In other words – exposure is the picture.
You don’t want your picture to be too dark (underexposed) or too light (overexposed).
Set your camera into the "M" mode. This stands for "Manual."
First, make a decision:
1. Do I want my pictures to have a blurry background? Then set your aperture WIDE open (small number). Do I want everything in focus? Set your aperture to the smallest number.
2. OR.... do I want a fast shutter speed? Set your ss at a fast SS (1/1000 for example). Do I want a slow SS? Set your SS slow (whatever you desire).
These are the two extremes, and as we learn more, we'll understand why we would use some of the middle settings.
Remember ---- you have to have BALANCE.
*If you set your aperture wide open (2.8), you will get a fast ss.
*If you close your aperture down (22), you will get a slow shutter speed.
_________________________________________________________________
Two Peas in a Bucket (Week 2 Lesson, Park 2):
"Turn your camera dial to Manual mode (usually indicated by an “M.”)
Choose a non-moving object either indoors or outdoors.
Step 1: Consider your surroundings.
Step 2: Consider your priority. Aperture controls the amount of the photo in focus -- do you want to limit your depth of field? Shutter speed controls the pace of the photo - do you want to freeze or blur the action?
Step 3: Select the number on the camera.If you’ve chosen aperture as your priority, set your f/stop. If you’ve chosen shutter speed, set it.
Step 4: Focus on your subject and press the shutter button half-way down.Find the blinking line on your exposure meter -- is the image underexposed (-) or overexposed (+)?
Step 5: To balance your exposure, you will need to change the OTHER number (the one that’s not the priority.) If you selected your aperture, change the shutter speed until your line is centered on the exposure meter. If you selected your shutter speed, change the f/stop until your line is centered. As you’re turning the dial for either setting, keep an eye on the exposure meter. If the line is going in the wrong direction (not toward center) reverse the dial.....and, relax! Whew!
___________________________________________________________________
Disclaimer:
Okay, so we’re not really finished yet. Look at the numbers through the viewfinder again. Is your shutter speed 60 or above? If not, you may have to decrease your f/stop. If your original priority was shutter speed, check your f/stop number.
Will that f/stop work with the amount of your subject you want in focus? Take the photo and find out! Are you not getting anywhere at all? Increase your ISO if your meter indicates that the image is severely underexposed. Decrease your ISO if your meter indicates that the image is severely overexposed."
___________________________________________________________________
WHITE BALANCE
For a more detailed description, please refer to "Two Peas in a Bucket, Week 3."
Here it is in a really, really small nutshell:
All light emits a particular color. When you're indoors, this light can be very unappealing to your pictures. Your camera has settings to help you get the "correct" color. These include: cloudy, sunny, fluorescent, incandescent (regular light bulbs), etc. If you set your camera's white balance to the situation you're in, you will get more accurately colored pictures. Whew, that was quick!
Here are some pictures to help you see the difference: (I know you all wanted to see pictures of my toilet bowl cleaner!) :) These pictures were taken in my laundry room where we are oh-so-lucky to have fluoescent lighting.
AUTO WB
 CLOUDY WB
 TUNGSTEN WB
 FLUROSCENT WB
Here are some more pictures. These were taken with a mix of lighting - regular lightbulbs (very very dim compared to the window) and natural light through the window. I shot the last picture in "Custom WB" where I set the white balance. If anyone is interested, I can teach you this later.
AUTO WB

TUNGSTEN WB
 FLUORESENT WB
DAYLIGHT WB
CUSTOM WB
This months CHALLENGE:
Shoot in manual mode. At least give it a shot. Again, I can talk and teach you until I'm blue in the face, but until you actually try it, you're not going to learn. It's really not as hard as it first seems. You'll get the hang of it, and you'll be taking better pictures!
Try shooting different objects in different white balance modes. Some of the most creative pictures have been taken in a different setting than you're actually in. White balance is critical for indoor pictures.
Post your pictures on here for all to see.
Also, we will be going to Thanksgiving Point Gardens on Thursday, May 7th at 6 pm. If you could drop me an e-mail to let me know if you are planning on coming, that would be great. Some of you have let me know that they can't make it because of meetings, and if we don't have enough people going, we can reschedule and/or plan a second trip. I LOVE that place and don't mind going a couple of different times to plan around your schedules. :) Just let me know.
The price for the gardens are $10/adult and $6/child, but because Todd and I have a membership, you get in for half price. I really don't mind if you bring your families - I know some of you mentioned that you want to leave the kidlets at home. It's a fun date place!
You can send me an e-mail at: taggartphotography@gmail.com or the e-mail you already have.
Subscribe to:
Posts (Atom)